If your sink or tub pop-up stopper is stuck, won’t seal, won’t stay up, or drains slowly, the problem is usually caused by hair buildup, linkage misalignment, or worn parts—and many repairs take only a few minutes.

In This Article:
Quick Answer
Common Pop-Up Problems
How a Pop-Up Stopper Works
Quick & Easy Fix
How to Remove a Sink Stopper
How to Fix a Sink Pop-Up Stopper
How to Fix a Bathtub Pop-Up Stopper
When to Replace the Stopper
FAQs
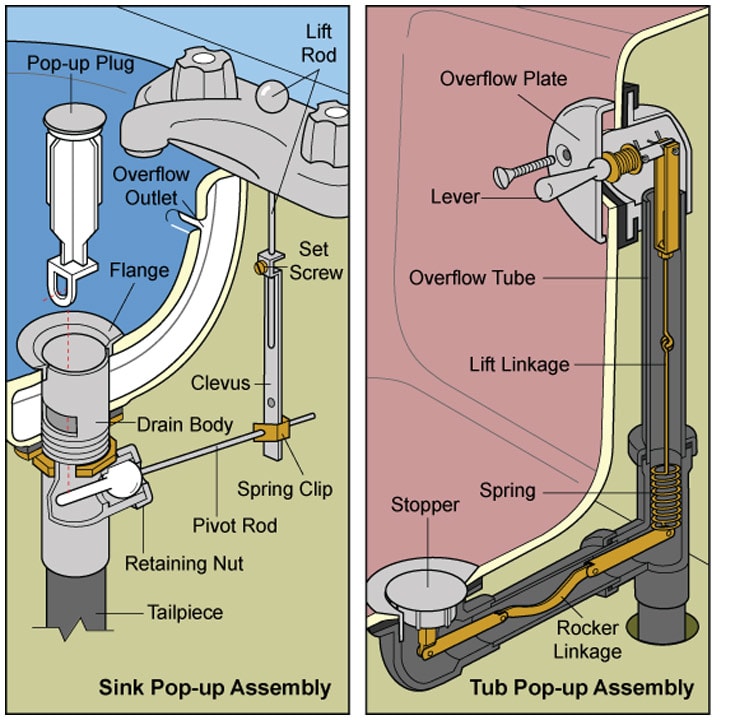
Most sink and tub pop-up stoppers use a simple mechanical linkage hidden beneath the fixture.
When the lift rod is pulled up or pushed down, it moves a pivot rod that raises or lowers the stopper inside the drain.
Over time, problems develop because of:
- Hair buildup
- Soap scum
- Corrosion
- Loose linkage parts
- Misalignment
- Worn seals
Fortunately, many repairs require only basic tools and simple adjustments.
Quick Answer
If a sink or tub pop-up stopper is stuck, first remove and clean the stopper thoroughly. If the problem continues, adjust the pivot rod and linkage beneath the sink or replace worn stopper parts. Many pop-up repairs take less than 30 minutes.

Don’s Advice
Before adjusting the linkage, always remove and clean the stopper first.
Hair and soap buildup cause a surprisingly large percentage of pop-up problems—and cleaning alone often solves the issue completely.
Common Pop-Up Stopper Problems
| Problem | Likely Cause | Typical Fix |
|---|---|---|
| Stopper won’t stay up | Loose linkage or disconnected pivot rod | Reconnect or adjust linkage |
| Stopper won’t close | Pivot rod misalignment | Adjust pivot rod position |
| Stopper stuck closed | Hair and debris buildup | Remove and clean stopper |
| Stopper leaks | Worn seal or poor alignment | Adjust or replace stopper |
| Water drains slowly | Hair clog below stopper | Remove buildup from drain |
How a Pop-Up Stopper Works
A typical sink pop-up assembly uses several connected parts:
- Lift rod: the small rod behind the faucet that you pull up or push down.
- Clevis strap: the flat metal strip with holes under the sink.
- Pivot rod: the horizontal rod that enters the drain assembly.
- Stopper: the plug inside the drain opening.
When you pull the lift rod, it moves the clevis strap. The clevis strap moves the pivot rod. The pivot rod then raises or lowers the stopper inside the drain.

If this linkage loosens or slips out of position, the stopper won’t open or close properly.
If any of these parts loosen, disconnect, corrode, or become clogged with debris, the stopper may stop working properly.
Quick & Easy Pop-Up Stopper Fix
If you want the fastest solution, replacing the stopper itself is often easiest.
Modern universal push-button stoppers eliminate the old-style linkage entirely and can be a good fix when the old linkage is corroded, missing, or not worth adjusting.
- Buy a universal replacement stopper, usually about $10 to $15.
- Pull out the old stopper if it lifts free.
- If the old stopper is locked in place, disconnect the pivot rod beneath the sink first.
- Insert the new stopper into the drain opening.
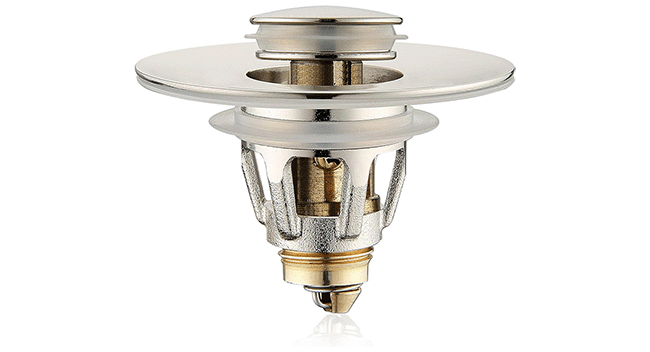
This is often the easiest repair if you simply want the sink to hold water again and do not care about restoring the original lift-rod mechanism.
How to Remove a Sink Stopper
Removing the stopper is usually the first step in troubleshooting.
1. Try Pulling the Stopper Straight Up
Raise the stopper fully and pull upward gently.
Some stoppers lift out without tools. If it releases, clean it thoroughly and inspect the drain opening for hair and buildup.
If the stopper will not come out, the pivot rod is probably engaged through a hole or slot in the bottom of the stopper.
2. Locate the Pivot Rod Under the Sink
Look beneath the sink behind the drainpipe.
You should see a horizontal rod entering the back of the drain assembly. This is the pivot rod.
The pivot rod is usually held in place by:
- A round retaining nut where the rod enters the drain body
- A spring clip where the rod connects to the clevis strap
3. Disconnect the Pivot Rod
Place a towel or small container under the drain body to catch drips.
Then loosen the retaining nut by hand or with pliers if necessary.
Slide the pivot rod backward just enough to release the stopper. Once the rod is disengaged, lift the stopper out from above.
4. Clean the Stopper Thoroughly
Hair and soap buildup commonly collect around:
- The stopper body
- The pivot hole or slot
- The drain throat
- The top of the drainpipe
Use paper towels, an old toothbrush, and mild cleaner to remove buildup completely.
If the sink has been draining slowly, pull out any visible hair or debris from the drain opening before reinstalling the stopper.
How to Fix a Sink Pop-Up Stopper
1. Inspect the Linkage Assembly
Look beneath the sink and inspect the lift rod, clevis strap, pivot rod, retaining nut, and spring clip.
The clevis strap is the flat metal strip with several holes in it. It connects the vertical lift rod to the horizontal pivot rod.
Look for:
- Disconnected clips
- Bent rods
- Corrosion
- Loose nuts
- Missing parts
2. Reconnect Loose Parts
If the pivot rod has slipped out of the clevis strap, reinsert it through one of the adjustment holes and reinstall the spring clip.
The spring clip pinches onto the pivot rod and keeps the clevis strap from slipping off.
If the lift rod is loose where it connects to the clevis strap, tighten the small screw or clamp that holds the lift rod in place.
3. Adjust the Stopper Height
If the stopper does not open or close fully, adjust the linkage.
Move the pivot rod to a different hole in the clevis strap:
- Use a higher hole if the stopper needs more lift.
- Use a lower hole if the stopper sits too high or will not close fully.
Small changes can make a big difference in how far the stopper travels.
Don’s Advice
If the stopper barely moves, don’t immediately assume something is broken.
Very often, the pivot rod simply needs to be moved to a different hole in the clevis strap for proper travel distance.
4. Reinstall the Stopper Correctly
The stopper often has a hole or slot near its bottom. The pivot rod must pass through or engage this opening for the lift rod to control the stopper.
Insert the stopper from above while guiding the pivot rod back into the drain body from below.
If the stopper rotates freely and does not respond to the lift rod, the pivot rod probably missed the opening in the stopper. Pull it out and try again.
5. Tighten the Pivot Retaining Nut
Once the stopper works correctly, tighten the retaining nut where the pivot rod enters the drain body.
Do not overtighten it. The pivot rod must still move freely.
If water leaks around the pivot ball:
- Tighten the retaining nut slightly.
- If it still leaks, replace the pivot gasket or washer.
Related article:
How to Clear Drain Clogs
How to Fix a Bathtub Pop-Up Stopper
Bathtub pop-up stoppers work differently from sink stoppers. Most use a linkage assembly hidden behind the overflow cover plate.
The overflow plate is the round or oval metal plate on the tub wall below the tub spout.
1. Remove the Overflow Plate
Remove the screws holding the overflow plate in place.
Hold the plate as you remove the final screw so it does not drop or scratch the tub.
2. Pull Out the Linkage Assembly
Gently pull the overflow plate and linkage assembly outward.
The assembly may include rods, springs, and a plunger that controls the stopper inside the drain.
Move slowly. Old linkage parts can be corroded or fragile.
3. Clean and Inspect the Parts
Look for:
- Soap buildup
- Hair
- Corrosion
- Loose joints
- Damaged seals
- Bent linkage rods
Clean the parts and remove debris before adjusting anything.
4. Adjust the Linkage Length
If the stopper does not seal or open properly, adjust the linkage length according to the design of the mechanism.
Small adjustments change how deeply the internal plunger or stopper seats inside the drain.
If the tub will not hold water, the linkage may need to be lengthened or shortened so the stopper seats more firmly.
5. Reinstall and Test
Slide the linkage assembly back into the overflow opening carefully.
Reinstall the overflow plate loosely at first, then test the stopper several times.
Once the stopper opens and closes correctly, tighten the screws.
When to Replace the Stopper
Replace the stopper assembly if:
- The linkage is badly corroded
- The stopper seal is worn out
- The pivot rod is damaged
- The mechanism repeatedly sticks
- The stopper no longer seals reliably
- Adjustment no longer improves operation
Universal replacement kits are often inexpensive and easier than rebuilding heavily worn assemblies.
Need Professional Help?
If the drain assembly leaks, the linkage is badly corroded, or the repair requires removing plumbing parts, a plumber may be the safest solution.
Find a trusted local plumber for drain and stopper repairs.
FAQs
Why is my sink stopper stuck closed?
Hair, soap scum, or a misaligned pivot rod are the most common causes.
Why won’t my sink stopper stay up?
The linkage may be loose, disconnected, or improperly adjusted.
What is the pivot rod?
The pivot rod is the horizontal rod beneath the sink that enters the drain body and raises or lowers the stopper.
Can I remove a sink stopper without tools?
Sometimes. Some stoppers lift out directly, while others require disconnecting the pivot rod beneath the sink.
Why does water leak under the sink after I adjusted the stopper?
The pivot retaining nut may be loose, or the pivot gasket may need replacement.
Should I replace the entire stopper assembly?
If the linkage is badly corroded or repeatedly fails, replacement is often easier and more reliable.