Planing a door can solve rubbing, sticking, and clearance problems—but only if done carefully. Removing too much material or planing the wrong edge can create permanent gaps, poor latching, or air leaks. Here’s how to plane a wood door properly without damaging it.

Quick Answer
When a Door Should Be Planed
When NOT to Plane a Door
Which Doors Can Be Planed
Best Tools for Planing a Door
How to Mark the Rubbing Areas
Remove the Door
How to Plane the Door
Plane With the Grain
Protect the Latch-Side Bevel
Trimming the Bottom Edge
Seal the Bare Wood
FAQs
Planing removes a thin layer of wood from the edge of a door so the door can move freely inside the frame.
In many cases, only a very small amount of material needs to be removed.
The key is identifying the exact rubbing area and removing as little wood as possible.
Most homeowners run into trouble when they:
- Plane before diagnosing the real problem
- Remove too much material
- Damage the latch-side bevel
- Plane against the grain
- Leave bare wood unsealed afterward
Quick Answer
A wood door can usually be planed safely if it rubs consistently against the frame or flooring after hinge adjustments have already been checked.
Use a sharp hand plane or sanding block to remove small amounts gradually, test-fitting the door often. Always preserve the latch-edge bevel and reseal exposed wood afterward.

Don’s Advice
The biggest mistake I see is homeowners removing too much wood too quickly.
Most sticking doors need surprisingly little material removed—sometimes only the thickness of a couple sheets of paper.
When a Door Should Be Planed
Planing is appropriate when:
- A wood door consistently rubs the jamb
- The bottom edge drags after flooring changes
- The door has swollen slightly from humidity
- Minor alignment corrections are needed
Typically, planing becomes necessary only after:
- Hinges have been tightened
- Sagging issues have been corrected
- Paint buildup has been removed
See also:
How to Fix a Sticking Door
When NOT to Plane a Door
Sometimes trimming the door is the wrong solution.
Avoid planing if:
- The hinges are loose
- The house is actively settling
- The sticking occurs only briefly during humid weather
- The frame itself is shifting
- Paint buildup is causing the rubbing
Exterior doors especially should be trimmed cautiously because excessive gaps can create:
- Air leaks
- Water intrusion
- Poor weatherstripping contact
- Security problems
Which Doors Can Be Planed?
Planing techniques are intended primarily for wood doors, including:
- Solid-wood doors
- Painted hollow-core interior doors
- Wood-veneer or hardboard-skin interior doors
Steel doors should never be planed.
Fiberglass doors generally require different repair methods, and some laminate or composite doors can be damaged by aggressive sanding or trimming.
If you are unsure about the door material, check the manufacturer’s recommendations before modifying the door.
Best Tools for Planing a Door
Several tools can work well depending on how much material must be removed.
| Tool | Best Use |
|---|---|
| Jack plane | General edge planing |
| Block plane | Small touch-up areas |
| Sanding block | Minor rubbing corrections |
| Belt sander | Fast material removal with caution |
A sharp hand plane usually gives the best control and cleanest results.
Power sanders remove material quickly but can create uneven edges if used aggressively.
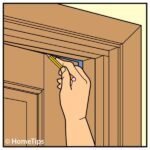
How to Mark the Rubbing Areas
Before removing the door, identify exactly where it binds.
Close the door slowly and look for:
- Scrape marks
- Paint transfer
- Shiny contact points
- Areas where the reveal disappears
You can also slide a thin piece of cardboard between the door and jamb to locate tight spots.
Mark the rubbing areas lightly with pencil.


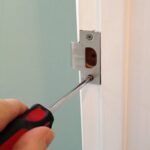
How to Remove the Door
For heavier trimming, remove the door from its hinges.
Open the door slightly and support its weight underneath with:
- Wood shims
- A pry bar
- A helper
Then tap out the hinge pins carefully with:
- A nail set
- A screwdriver
- A hammer
Lift the door free and place it securely on sawhorses.
See:
How to Remove a Door
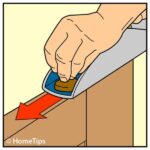
How to Plane the Door
1. Secure the Door Firmly
Support the door so it cannot rock or shift while you work.
A stable setup produces smoother, safer cuts.
2. Set the Plane for Shallow Cuts
Adjust the blade to remove only thin shavings.
Deep cuts increase the risk of gouging or splintering the wood.
3. Remove Small Amounts Gradually
Work slowly and check your progress often.
Typically, the clearance around a door should end up roughly about the thickness of a dime.
Avoid trying to remove all the material in one pass.

4. Check the Fit Frequently
Rehang or test-fit the door periodically.
Minor changes often make a surprisingly large difference in clearance.
Don’s Advice
If the door sticks mainly during humid weather, be especially conservative.
Wood doors often shrink slightly during drier seasons, and over-planing can leave permanent uneven gaps later.
Plane With the Grain Whenever Possible
Planing against the wood grain can tear or splinter the surface.
Look closely at the wood grain direction before beginning.
When trimming the top or bottom edge:
- Work from the outer corners toward the center
- Avoid planing outward off the edge
This helps prevent splitting at the corners.
If the wood begins tearing instead of shaving smoothly:
- Reverse direction
- Sharpen the blade
- Reduce the cut depth
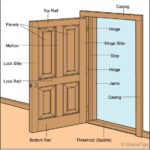
Protect the Latch-Side Bevel
Most doors are slightly beveled along the latch edge so they close smoothly against the jamb.
This angled edge is easy to damage accidentally.
Avoid flattening or changing this bevel significantly while trimming.
If too much material is removed from the latch side:
- The latch may not align properly
- Visible gaps may appear
- The door may close poorly
Trimming the Bottom Edge of a Door
Sometimes flooring changes reduce the clearance beneath a door.
This commonly happens after:
- New carpet installation
- Thicker carpet padding
- Tile installation
- Added flooring layers
Before trimming the bottom:
- Check for loose hinges first
- Verify the door is not sagging
If trimming becomes necessary:
- Remove only a small amount
- Keep the bottom edge level
- Reseal exposed wood afterward
Always Seal Bare Wood After Planing
Freshly exposed wood absorbs moisture more easily than painted or sealed surfaces.
After sanding or planing:
- Prime exposed wood
- Paint or seal the edge
- Allow finishes to dry fully before rehanging
Skipping this step can allow the door to swell again later.
Need Professional Help?
If the door frame is badly out of square or the door requires major trimming, a carpenter can diagnose the underlying alignment problem properly.
FAQs
How much should I plane off a sticking door?
Usually only a very small amount. Remove material gradually and test-fit often.
Can you plane a hollow-core door?
Most painted hollow-core interior doors with wood or hardboard skins can be trimmed lightly. Avoid removing too much material near the edges.
Can you plane a steel door?
No. Steel doors should not be planed.
Should I use a hand plane or belt sander?
A sharp hand plane usually gives better control. Belt sanders remove material quickly and can create uneven edges if used aggressively.
Why does my door stick only in humid weather?
Wood absorbs moisture from humid air and expands slightly, reducing the clearance around the frame.