If your water heater temperature and pressure (T&P) relief valve is leaking, dripping, or not working properly, don’t ignore it. This valve is a critical safety device that protects the water heater from dangerous pressure and temperature buildup. In many cases, a leaking valve points to excessive pressure, thermal expansion, overheating, or a worn valve that needs replacement.

Quick Answer
What a T&P Valve Does
Common Problems
Why It Leaks
Thermal Expansion Explained
How to Test the Valve
How to Replace the Valve
When to Call a Plumber
FAQs
The temperature and pressure relief valve—often called a T&P valve—is one of the most important safety devices on a water heater. If pressure or temperature inside the tank rises to unsafe levels, the valve automatically releases water to reduce the danger.
A leaking valve doesn’t always mean the valve itself is bad. In many cases, the valve is doing exactly what it was designed to do by relieving excessive pressure.
Quick Answer
If your water heater T&P valve leaks, first determine whether the problem is excessive water pressure, thermal expansion, overheating, or a faulty valve.
If the valve fails to release water during testing, replace it immediately. If it continues leaking after testing, replacement is usually the safest solution.

Don’s Advice
Don’t assume a leaking relief valve automatically means the valve has failed. I’ve seen many homeowners replace the valve only to discover that the new one leaks too. The real culprit is often excessive water pressure or thermal expansion somewhere in the plumbing system.
What Does a Water Heater T&P Valve Do?
The T&P valve protects your water heater from dangerous pressure and temperature buildup.
Under normal operation, the valve remains closed. But if pressure inside the tank rises too high or the water becomes dangerously hot, the valve opens automatically and discharges water through a drain pipe.
Without a functioning relief valve, excessive pressure could damage the water heater or, in extreme cases, cause catastrophic tank failure.
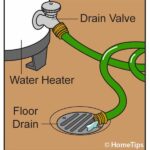
The valve is typically mounted near the top of the tank and connected to a discharge pipe that directs hot water safely toward the floor.
If the valve leaks, fails to open, or shows signs of corrosion, it should be inspected promptly.
Common T&P Valve Problems & Fixes
| Problem | Most Likely Cause | Recommended Action |
|---|---|---|
| Occasional dripping | Normal thermal expansion | Monitor and check for expansion control |
| Frequent dripping | High water pressure or thermal expansion | Check pressure and expansion tank |
| Constant leaking | Failed valve or excessive pressure | Investigate and replace if necessary |
| No water when tested | Stuck valve | Replace immediately |
| Valve leaks after testing | Mineral buildup on valve seat | Replace valve |
| Sudden heavy discharge | Dangerous overheating or overpressure | Shut down heater and investigate immediately |
Why a Water Heater Relief Valve Leaks
A small amount of occasional dripping may be normal, but frequent or continuous leaking usually signals a problem.
Common causes include:
- Excessive water pressure (typically above 80 psi)
- Water overheating
- Thermal expansion during normal heating cycles
- A worn or damaged valve
- Mineral deposits preventing the valve from sealing properly
If hot water is discharging forcefully from the relief valve, shut off power or fuel to the water heater and investigate immediately.

A failed safety valve can allow dangerous pressure buildup inside a water heater.
Thermal Expansion May Be the Real Problem
Many homeowners assume a leaking relief valve means the valve itself is defective. In reality, repeated dripping is often caused by thermal expansion.
As water heats, it expands. In an open plumbing system, the extra pressure can dissipate back into the municipal water supply. But many modern homes have pressure-reducing valves, backflow preventers, or other devices that create a closed plumbing system.
When heated water has nowhere to expand, pressure rises inside the plumbing system and the T&P valve may open briefly to relieve that pressure.
If this is the cause, replacing the valve alone may not solve the problem.
An expansion tank installed on the cold-water supply line often prevents these pressure spikes and helps protect both the water heater and plumbing fixtures.
Safety Warning:Never cap, plug, or remove a water heater relief valve. Never cap the discharge pipe attached to it. The valve and discharge pipe are essential safety devices designed to prevent dangerous pressure buildup.
How to Test a Water Heater T&P Valve
Testing the valve periodically helps verify that it can open and close properly.
Before testing:
- Make sure nobody is standing near the discharge pipe.
- Place a bucket beneath the discharge outlet if practical.
- Be aware that discharged water may be very hot.
To test the valve:
- Lift the valve’s test lever slowly.
- Allow water to flow for a few seconds.
- Release the lever.
- Verify that water flow stops completely.
A properly functioning valve should release water when opened and stop flowing when the lever is released.
If no water flows during the test, the valve may be stuck and should be replaced immediately.
If the valve continues dripping after the test, mineral deposits may be preventing it from sealing properly.
Important: Older valves sometimes begin leaking after a test because mineral deposits become trapped on the valve seat. If the valve continues dripping several hours after testing, replacement is usually the safest solution.

A leaking, corroded, or malfunctioning T&P valve should be replaced promptly.
How to Replace a Water Heater T&P Relief Valve
If the valve leaks continuously, fails a test, or shows signs of corrosion, replacement is usually straightforward for an experienced DIYer.
Before starting, purchase a replacement valve with the same pressure and temperature ratings as the original. The ratings are typically stamped on the valve body.
Tools & Materials
- Replacement T&P valve
- Pipe wrench or large adjustable wrench
- PTFE thread-seal tape or approved pipe-thread sealant
- Garden hose
- Bucket
- Work gloves
- Safety glasses
Step 1: Turn Off Power or Fuel
For electric water heaters, switch off the circuit breaker.
For gas water heaters, turn the gas control valve to the Pilot setting or shut off the gas supply according to the manufacturer’s instructions.
Step 2: Shut Off the Cold-Water Supply
Close the cold-water shutoff valve feeding the water heater.
This prevents the tank from refilling while you work.
Step 3: Lower the Water Level Below the Valve
Connect a garden hose to the drain valve near the bottom of the tank.
Drain enough water so the water level falls below the relief valve opening. Depending on the valve location, this may require draining only a few gallons or substantially more.

Lower the water level below the relief valve before removing it.
Step 4: Relieve Pressure
Open a nearby hot-water faucet.
Then carefully lift the T&P valve lever to release any remaining pressure inside the tank.
Step 5: Remove the Discharge Pipe
Unscrew the discharge pipe connected to the valve.
Inspect the pipe while it’s removed. Replace it if it is damaged, corroded, improperly sized, or incorrectly routed.
Step 6: Remove the Old Valve
Use a pipe wrench or large adjustable wrench to turn the valve counterclockwise.
Once loosened, remove it completely.
Inspect the valve opening for corrosion, debris, or damaged threads.
Step 7: Install the New Valve
Wrap the valve threads with PTFE thread-seal tape or apply approved thread sealant.
Thread the new valve into the opening by hand and tighten securely with a wrench.
Do not overtighten.
Step 8: Reinstall the Discharge Pipe
Reconnect the discharge pipe to the new valve.
The pipe should terminate near the floor and remain unobstructed at all times.
Step 9: Refill the Water Heater
Close the drain valve.
Open the cold-water supply valve.
Leave a nearby hot-water faucet open until air is purged from the system and a steady stream of water flows.
Step 10: Restore Power or Fuel
Once the tank is completely full:
- Restore electrical power to an electric water heater.
- Relight or reactivate a gas water heater according to the manufacturer’s instructions.
Never energize an electric water heater before the tank is completely full. Doing so can destroy the heating elements.
Don’s Advice
One of the most common mistakes I see is replacing the valve without addressing the cause of the problem. If excessive water pressure or thermal expansion caused the original valve to leak, the new valve may begin leaking too. Always investigate why the valve opened before assuming the valve itself is at fault.
Discharge Pipe Requirements
The discharge pipe attached to a T&P valve is just as important as the valve itself.
The pipe should:
- Be the same diameter as the valve outlet
- Terminate close to the floor
- Point downward
- Remain unobstructed
- Never be capped or plugged
The discharge pipe allows hot water to exit safely if the valve opens.
If you’re unsure whether your discharge pipe is installed correctly, have it inspected by a qualified plumber.
Repair or Replace the Valve?
In most cases, replacement is the best solution.
| Condition | Recommendation |
|---|---|
| Valve drips occasionally | Check pressure and monitor |
| Valve leaks continuously | Replace valve and investigate cause |
| Valve fails test | Replace immediately |
| Valve leaks after testing | Usually replace |
| Valve shows corrosion | Replace |
Because the valve is a critical safety device and relatively inexpensive, repair is rarely recommended.
When to Call a Plumber
Contact a plumber if:
- The valve releases large amounts of hot water.
- The water heater repeatedly overheats.
- Household water pressure exceeds 80 psi.
- You suspect a failed thermostat or control system.
- You are uncomfortable working with hot-water plumbing.
- The water heater is old and showing multiple signs of failure.
Need Professional Help? If your water heater continues leaking after valve replacement or shows signs of excessive pressure, consult a qualified plumber.
FAQs
Is a leaking T&P valve dangerous?
It can be. A leaking valve may indicate excessive pressure, overheating, thermal expansion problems, or a failing safety device. The cause should be identified promptly.
Should a relief valve drip occasionally?
Occasional dripping may occur due to thermal expansion. Frequent or continuous leaking is not normal and should be investigated.
How often should I test my T&P valve?
Many manufacturers recommend testing it annually to verify proper operation.
Can I replace the valve myself?
Many experienced DIYers can replace a T&P valve safely, provided proper precautions are followed and the water heater is shut down correctly.
Why does the valve leak after I test it?
Testing can dislodge mineral deposits that prevent the valve from resealing completely. If leaking continues, replacement is usually recommended.
What happens if a T&P valve fails?
A failed valve can allow dangerous pressure or temperature buildup inside the tank. This is why the valve should never be capped, plugged, or removed.